I still don't like infrared motion detectors or thermometers, I am still convinced these are a waste of money for paranormal investigation.
Infrared photography using film is still very expensive, but it seems the advent of the digital camera has changed things to an enormous extent. I hadn't realised quite to what extent until my new infrared filter arrived in the post today. This is not a 'red' filter. It's 3mm thick and completely opaque to visible light, but transparent to infrared in the range 720-1600 nm. In short, you can't see a thing through it, but any digital camera can.
So I did what any sensible scientist does when presented with a new piece of equipment. I went out to play with it.
The digital camera I used is not an expensive one. It has the 'night-shot' facility, but as today was sunny I didn't use that. I took pictures without the filter, then took the same picture with the filter held over the lens. No modifications or setting up with this camera. I wanted to see what it could do.
Here's a sample.
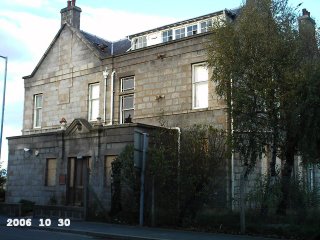 The house has been abandoned for many years. Behind it is a new office block, and they use this house for storage. I took this one, then immediately took the following using the filter:
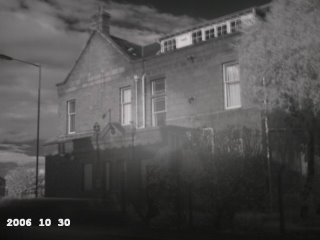
I need to use this with a tripod. The image is a little blurred due to the increased exposure time. No visible light passes the filter: the image is composed entirely of infrared. The light circle in the middle is an artefact: it's in all the pictures I took today and it's a consequence of using a cheap camera to try this out. I also have to work out how to turn off that annoying date-stamp. However, it's an impressive image from a cheap digital camera.
The point here is that all you now need to add infrared photography to your array of equipment is a small digital camera and a filter. This combination is unlikely to work well at night (I'll try it later) but works well during the day. The filter isn't cheap at £18 (roughly 35 dollars, I think), but good filters aren't cheap, and if you're going to try this, get a good one.
There was something in this particular photo that caught my eye, something that means I'll be visiting this location again.
Now, it could be an artefact, but if so it's a big one. The infared image appears to show a neatly-clipped hedge where the wall should be, and it's twice the height of the wall.
The obvious thing to do here is to go back, in daylight, and repeat the photograph. I'll do that tomorrow - weather permitting - and see if I can get the same result. If I do, it'll be a night-visit for sure. Getting access to this place won't be easy, but it might well be worth a try.
3 comments:
Why does the area under the left hand upper window (the one nearest the light post) look like there are 2 openings in the second pic when it clearly is solid in the first?
I think you're looking at the shadow of the building that was behind me. Infrared brings shadows out in sharp focus, much more than the straightforward daylight shot. There was light cloud cover, and the sun was behind me.
At this time of year, the sun is always low in the sky. So it's difficult to get a photo of a building with uniform sunlight.
Now that digital cameras can capture good infrared images, it's a much cheaper technique and worth looking at again.
I'm certainly going to include it. Yes, there are problems with false images and artefacts (the image I posted might be one) but film and development costs are zero, so it's worth trying.
Post a Comment